XSI 4.0 Feature Review:
Written
by Ed Harriss
As promised
in my XSI review for Rendernode,
a much more comprehensive review of XSI 4.0 has been written. It is
now listed below. SI Warriors... rejoice! :)
In this review I will elaborate on a lot of the new features in XSI 4.0. However, there are still many, many more new features that are not mentioned in this article. XSI 4.0 is such a massive upgrade that I simply did not have time to write up information on everything. Just to give you an idea of how huge this upgrade is, the "What's new in XSI 4.0" manual from Softimage is somewhere on the order of 400-500 pages long and my original write up for this article was over 30 pages. (Not including images.) But it's not the only "what's new" manual that's grown. For example, the scripting reference docs alone, have grown to over 3000 pages. I had to trim out quite a bit. But I promise that I tried my best to leave most of the fun stuff in.
|
![]() |
Interface
The interface has been reworked under the hood. It still looks very much the same but it now provides many new functions that were previously impossible. Such as relational views, a new type of view that contains many other views that work together as a team. They are very easy to make as creating these views works much like building a layout for your interface. As an added bonus, the interface no longer hides buttons and controls when it is resized and it is relatively easy to add commands to the right-click menu as well as the other existing menus. |
Ghosting
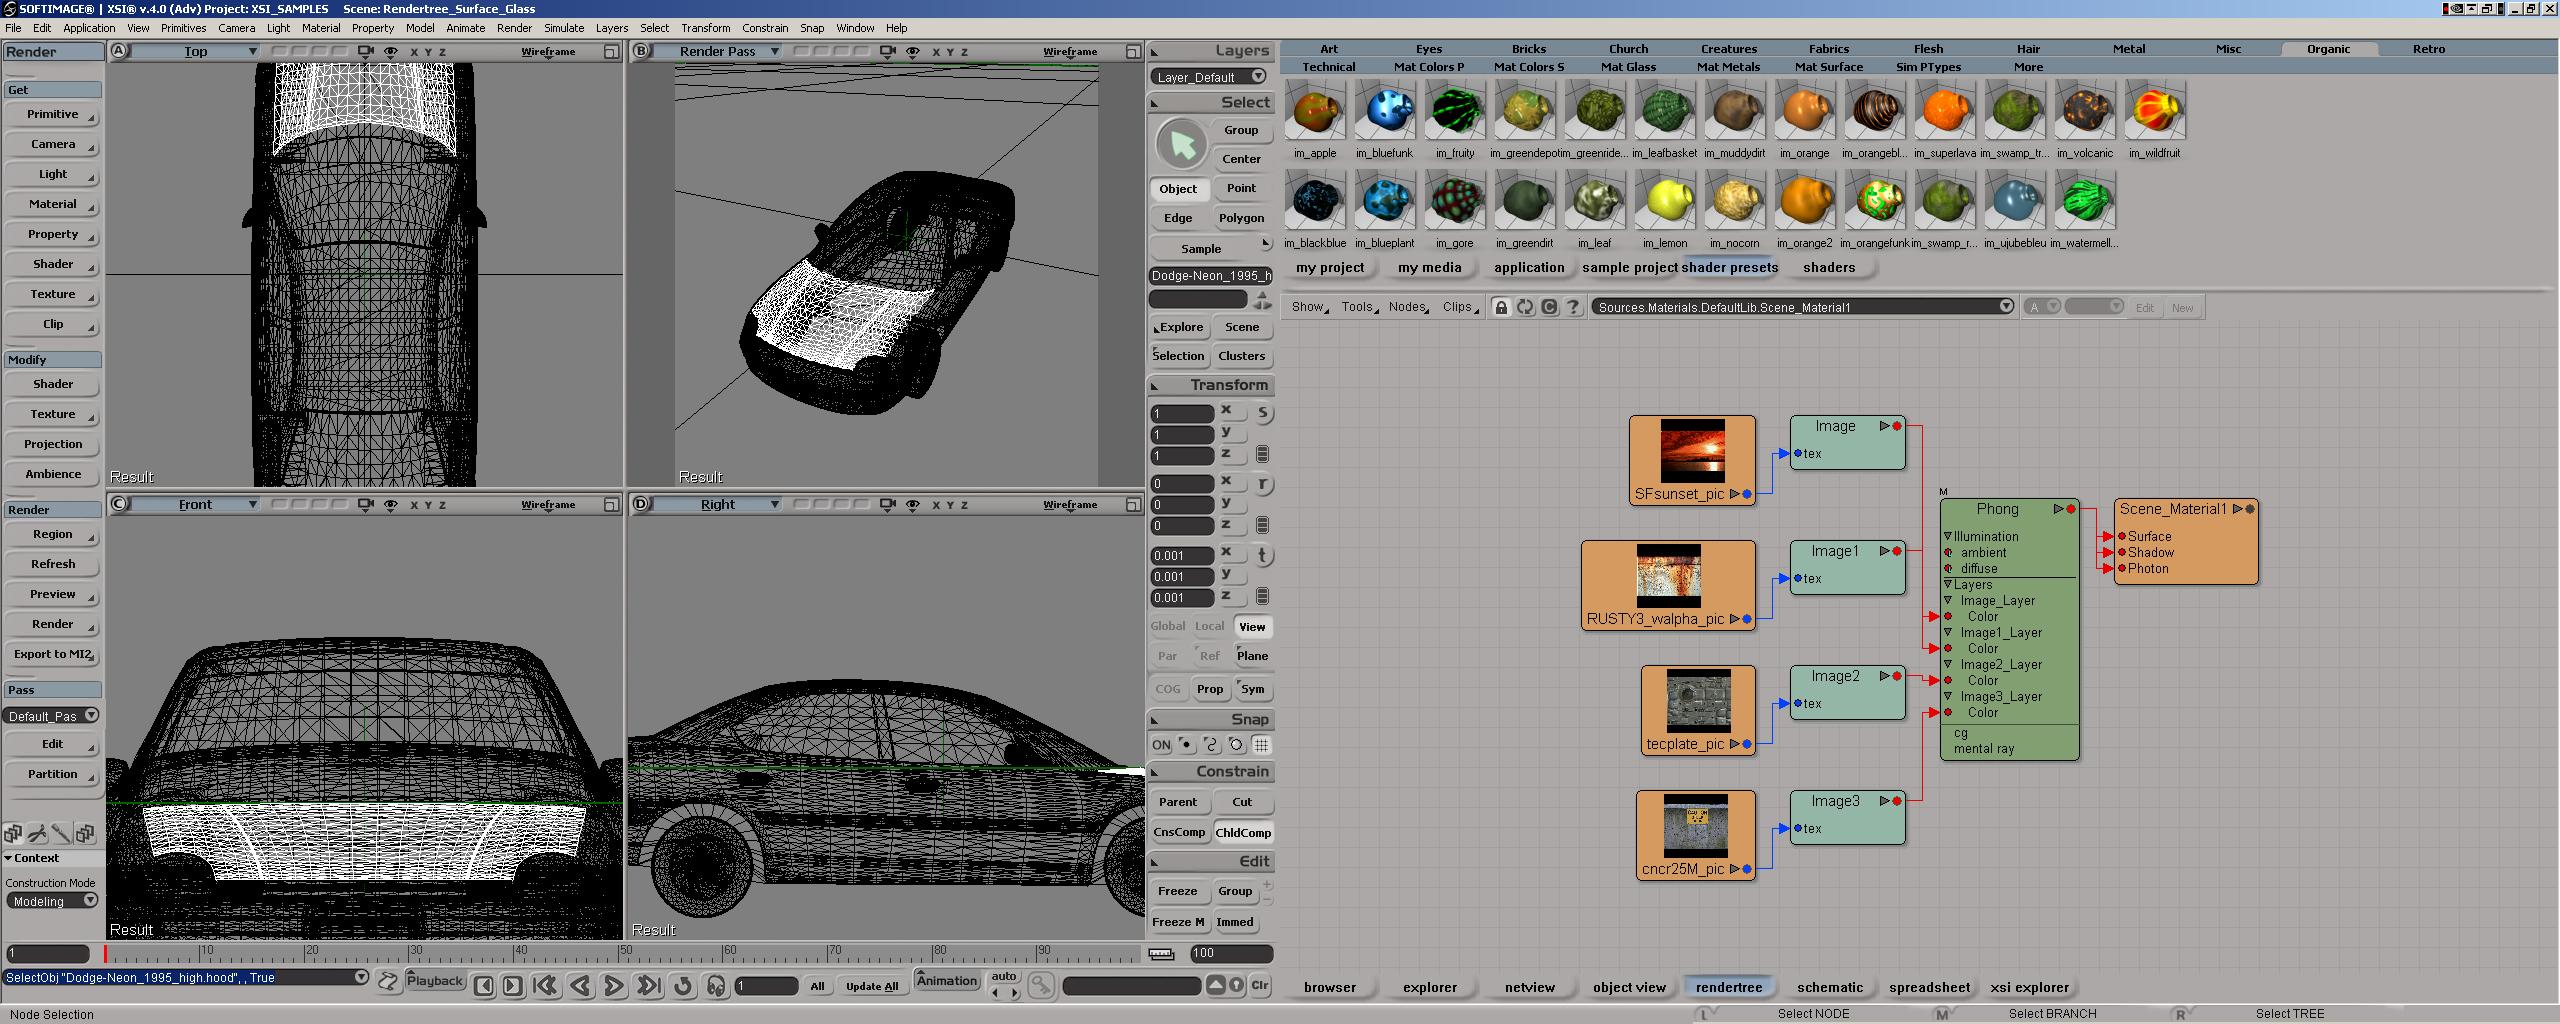
While previous versions of XSI had some ghosting ability, it was nothing like the new ghosting that has been implemented in XSI 4.0. With the new functions you can ghost just about any animated function. Hair, Bones, Cloth, Softbodies, Hardbodies, etc. You can even turn on ghosting during the creation of rigid body dynamic simulations, adjust the sliders, change the position of objects and see how they will affect your simulation when it plays. No more tweaking values and running simulations a 100 times until your ball makes it through the hoop. Ghost it into the future, then adjust your sliders until the ghost shows the ball going where you want it to. This is a tremendous timesaver. Ghosting is very powerful and incredibly versatile. It has both a camera option and a per object option. You can choose which cameras show ghosting and how they display per camera. Each camera can have a unique setting for ghosting colors, trail length, and fading effects. Each camera can have a unique setting for whether to show per frame ghosting, ghosting key frames, or both. |
Ghosting
per object is treated as a visibility property, alongside view and
render visibility. Each object's ghost can have a unique graphical
representation. Object ghosting ghosts the entire object geometry.
Point ghosting ghosts just a position marker, no rotation info. Pose
ghosting ghosts the object's center. Trail ghosting creates a curve
path the ghosted object is traveling on. Velocity ghosts a vector
representation of the change in velocity over time. (This one is incredibly
powerful for checking animation smoothness!) There are so many options,
and it's tied into the architecture at a very core level, so a lot
of really cool tricks are out there just waiting to be discovered.
|
Custom
Display Host
The custom display host is pretty amazing. It let's you open any foreign application (such as a game engine) in a viewport. This means that a game developer can now run and test the game directly within XSI, no need to export everything anymore. You can easily play the game and test it, using a joystick or the keyboard . The custom view can also affect XSI's scene (ex: a user could select/modify a mountain in XSI, the mountain highlights would get highlighted/modified in the game viewer. Conversely, one could fly through the mountains on the game engine and see the camera in the XSI scene update accordingly. It is even possible to run another 2d or 3d application within the XSI viewport. |
XSI
layouts
XSI layouts have been completely revamped, described in a simple XML file and are now resolution independent. The new interface resizes on the fly. Until XSI 3.5 you could create layouts, but you could not really modify panels. In version 4 you can split horizontal/vertical panels and add several components to it. They are called Relational Views. (RV) Custom relations can be established between each panel, allowing actions done in one view to propagate to another view with a custom behavior. You can create RV's like you would a normal XSI layout, however, since RVs are saved as simple ASCII (XML) files that can also be edited by hand. |
XSI 4.0 comes with a lot of sample RVs. One if the sample Relational views is the Material and Texture Explorer. This gives users the long sought after "shaderball" tool. For instance, you can create one window that contains the render tree, the material editor and an explorer, or whatever you want. Aside from the new material editor you get also a new interface called texture layer editor. This gives you Photoshop like layers for your textures Autohide interface It is now possible to create layouts with auto-hide panels, that is views or framesets that will appear on screen only when the cursor enters a pre-defined area around the top/bottom/left/right side of the screen. Once the cursor leaves the view/panel that appeared, it will hide. You can create your own, but there is a sample layout with auto-hide panels for the left toolbars, right mcp and bottom play area that comes with XSI. Try it, you'll like it. Minimize floating windows. When you are working on a lot of parameters at the same time, the number of open windows can be daunting. There is a new function that will minimize all of your floating windows. With them minimized you can quickly cycle through them using the Ctrl-tab and Ctrl-shift-tab hotkeys. All floating views including the minimized ones will be listed on the 'Window' menu (next to help), where you can recall them. |
Dual
monitor Renderwindow
Those of you who have dual monitors know how annoying it is to have your render window display half on one and half on the other. Finally the render window now opens on the primary screen only, instead of opening between the two screens. Dual monitor users rejoice! Yayyy!!! I've been waiting since 1.0 for this function. This sure will make life eaiser. |
Reordering Scene Objects in the Explorer By default, objects in a scene are ordered according to when they were created or when they became children of their parent. This underlying order is reflected in the explorer and schematic views when objects are not sorted, and is also used when selecting the next or previous sibling using the buttons on the Select panel or the Alt+arrow keys. You can change this underlying order in the explorer using the new Reorder Tool.
There are now 'shelves' that expand existing toolbars and browsing abilities. 4.0 comes with a lot of sample shelves, such as: an Application Shelf, Shader Presets, Shaders, Project Shelf w/XSI Samples, etc 4.0 has support for thumbnails in a variety of places, in the render tree, on clips in the mixer, as well as Sources and Clips which can be seen in the shelf in a relational view. You can also associate a thumbnail to any user-namable node in an XSI scene (ex: shapes, actions, clusters..) There is improved on-screen display usage and functionality. Left click and drag on names and values to edit automatically using the virtual slider (that is you don't have to explicitly go in the virtual slider tool) double-click on values to edit them on-screen, double click on booleans to toggle them, etc The Codec used for viewport
capture is now persisted with the rest of the capture settings. Custom
commands and scripts can now be added to native menus. Toolbars have
been upgraded. |
Compositing and Paint tools
|
There's
the same type of resemblance between the XSI paint and Matador as there
is between the XSI FX tree and Illusion/Eddie. However it has many functions,
like scripting/expressions, and object-oriented vector shapes that Matador
definitely did not have.
It includes tools like a clone brush, magic wand selection, feathering, rectangular and elliptical marquee, unlimited undo, lasso Photoshop-style stencil tools and more. It also features 60 programmable user brush (pubs) presets from Avid Matador: color, airbrush, clone, merge, add, blur, darken, lighten, diffuse, drag, tint, erasers, more paint with brush texture, brush profile curve, etc. It can merge and clone from other frames using any operator in the tree as a merge source, including the result transform nodes or retiming operators. The vector paint is much the same, with the addition of shape types like bezier, b-spline and polyline. However, as good as the
paint tools are, I don't think that they are designed to be a full
texture painting solution. They are better at animated frame-by-frame
correction of image sequences, where a standalone program like Photoshop
would not be practical. This does not mean that you cannot do texturing
in the paint module. It has many of the standard tools that you'd
expect in any 2d paint program, and quite a few more. But it is not
Photoshop. |
Compositing
The compositor has had a big overhaul. Much has gone into making it work faster and use ram more efficiently. It does heavy temporal caching of file inputs. If there is plenty of ram available to the compositor it is possible that files being composited from disk are only accessed once. There is a new 2D Tracking tool in the compositor that allows 2 or 4 point tracking for stabilization or corner pinning. All the PainterlyFx operators are now multithreaded. There is a new "Image Compare" feature in the Fx Viewer to save a region of the image to compare before / after while tweaking effects. The PNG image format is now supported. The browser now understands a file sequence with negative numbers. The XSI image clips also support negative frame numbers. Ctrl+H (like in Photoshop) now toggles the state of "Show Marquee" (this is like "Hide Edges" in Photoshop). Working together with the new paint tools in XSI, any operator in the tree can be used as a paint mask to protect areas of the image There is now an FX Tree
SDK which provides support for "UFO" plugins. UFO stands
for "User Function Objects". This API allows writing plug-ins
for the FxTree and offers full access to the internal implementation
of image plug-ins, with services for parameter definition and validation
and access, region calculation, multithreaded processing, implementing
viewer interactive tools. One of the new nodes written as a "UFO"
plugin is called "Fake 3D." This tool allows you to do some
very cool Fog and 3D lighting using .norm and .Zpic files.
|
Mojo
Another cool feature is Avid Mojo support. Mojo is a Digital Nonlinear Accelerator that delivers the power of true real-time effects, real-time D1 input and output. Mojo can display any XSI view, even ones containing a render region and it accepts output from the built in compositor. The display is also interactive allowing you to switch views in real time while it is displaying. Not only is this nice for compositors, as they will be able to see the final output on a separate monitor, but it provides a fantastic way to output to tape and to do real time capture. It is extremely fast at updating, practically real-time for small scenes. However, if needed you can slow it down for very heavy scenes. This way, animators won't have to offload to a DDR to check their animation. The time savings are huge. XSI can read/write Avid
Xpress media. So
If the machine that has the Mojo installed
also has Avid Xpress DV or Pro installed you will be able to capture
and log media in Xpress, and link to it in XSI. You might render media
in XSI and be able output to tape using Avid Xpress. |
Rendering
Rendering and mental
ray 3.3 |
BSP maximum memory option. These options set the maximum amount of memory to use for building BSP trees (regular and shadow). This can help if a scene is using extraordinary amount of memory for BSP trees while rendering. The new option is called "Separate BSP for shadow objects" creates a separate BSP tree for objects that are shadow only. This is convenient when using high resolution objects for visible objects but simple shadow stand-ins for shadowing, since it makes lighting calculations perform much quicker since there is less geometry to deal with
|
Toon
Shaders
There have been some enhancements to toon shader such as: Added switches that allow ink to be drawn in output frame buffers (normal, depth, motion, tag). Toon now integrates a fisheye effect with toon lens. There is a new hemispherical (Fisheye) Lens Shader. This shader simulates a hemispherical (fisheye) lens capable of rendering a 180-degree field of view with characteristic hemispherical distortion typical of real-world fisheye lenses.
|
Render
Tree Workflow
There is a new improved workflow for inserting and using conversion shaders within property pages. (invert, color to scalar, etc.) The workflow has been modified to make inserting such conversion node easier, and also to make it more direct to navigate to the other shaders without having to bother with the conversion shaders on the way. You can actually insert any shader, not just conversion shaders. Each shader has the "main input" marked. When you insert, the old shader is moved to this main input For example, from the texture connection divot, there is now an "Insert shader" entry, which will allow you to insert a conversion shader. Once inserted, the connection divot shows a 'c' indicating that a conversion shader is connected. If you click on the divot, instead of inspecting the conversion shader, the next non-conversion shader is inspected. The idea is that you usually don't want to play with the invert, color correct nodes too much after initial setup; you want to go straight to the "hero" shader. 'Edit conversions' from the divot menu does however provide a way to edit the conversion shader if needed. You can even easily insert conversion shaders in the Render Tree. Right-click the connection line between two nodes and choose Insert >name of shader from the drop down menu
|
Render
Tree
There is a new option called Show Thumbnails. When enabled, clip nodes will show thumbnails associated with the clip. It is now possible to selectively hide the Render Tree toolbars by right-clicking an empty spot in the toolbar area and deselecting the appropriate menu item. The rendertree now display an M on top of metashaders. Expanding the shader node will also reveal the supported renderers
|
Overrides There has been a complete revamp of the override architecture for more robustness, performance and functionality. Override parameters are now animatable. (Visibility, for example.) Overrides can now propagate to clusters. When adding parameters to overrides, a new dialog box allows the user to specify if the selected parameters are shader entries or parameter entries. There is now a 'Remove Marked Entries' button in the Override PPG. Also added is proper support for Undo/Redo when adding and removing entries in overrides. Lights & Cameras
|
Batchserve
All versions of XSI come with free licenses of BatchServe. BatchServe is a web-based client/server processing system that allows users of SOFTIMAGE|XSI v.4.0 to automate and manage simultaneous processing or rendering jobs on a renderfarm, through an easy-to-use graphical interface. The system allows users to cue up, prioritize and manage processing and rendering jobs from anywhere with an internet connection - including PDAs - or from directly within the SOFTIMAGE|XSI system through the Net View. |
Materials
Libraries
There is a new materials library that has loads of new sample materials as well as a good system for storing current materials making it easier to re-use and deploy across distributed teams. It makes sharing materials across scenes very easy as well as reducing memory use and scene complexity. It makes finding all materials in a scene easy. You can delete all the materials in the scene in one shot easily. Old Scenes, when loaded, have their materials put in a library. You can also have 'referenced libraries' in dotXSI format that can thus be imported and exported as dotXSI files. Material and Texture Explorer The material and texture explorer is a new two-pane view that displays all of the materials, textures and shaders used by the objects in your scene. The left-hand pane is an explorer, from which you can select a scene object. The right-hand pane displays all of the object's materials, textures and shaders in separate tabs. |
When viewing an object's
materials, you can apply one object's material to another object by
dragging a material from the right-hand pane and dropping it on an
object in the explorer. The material and texture explorer is a useful
tool for working with texture layers because you can select all of
an object's shaders from one place, rather than digging down in the
material hierarchy. |
UV Unwrap
The new UV unwrap tools are a welcome addition to XSI. While it was possible to unwrap UVs using the subprojection tools and stamping the UVs this new tool automates that process saving a lot of time. Additionally the cubic mapping tool has been moved from the netview to the XSI interface and improved dramatically. |
Texture
Layers
There is a new concept called texture layers that is used to simplify the blending of images/shaders/shade trees. It uses compositing techniques to provide new and easy control over creating and editing texture layers. Dragging and dropping images on 3d objects will generate a texture layer. Layers can be visually collapsed or expanded, muted, solo'ed and locked. Reordering texture layers is now as easy as pressing the + and - keys. It also incudes blending options (like the layers function in Photoshop). |
Cubic
Texture Mapping
The netview cubic mapping tool has been turned into a "real" tool, greatly enhanced and is now available as a base projection like Planar and Cylindrical. When you apply a cubic projection to an object, the object's polygons are assigned to a specific face of the cube based either on the orientation of their polygon normals, or their positions relative to the cubic texture support. The texture is then projected onto each face using a planar or spherical projection method. |
Hardware
Shading/Rendering
There is a new tool called the XSI Graphic Sequencer. (XGS - aka real-time shading) It gives the user the ability to perform display callbacks. These are callbacks that can be called at different places in the display pipeline. They are useful for things like custom displays such as HUDs and scene level effects (such as fog, background image/colors) Also available are display passes which can operate on the entire scene or a selection of objects. They are typically used for scene multipass rendering effects such as depth of field and shadows. There are some nice shadow display options. XSI 4.0 also adds a new DirectX9 display mode for displaying DirectX 9.0 realtime shaders. There is a new renderer option in the rendering options. You can now choose between Mental Ray, CG,OpenGL and many other options. The new OpenGL based renderer uses the current camera settings to render the image. Note that you can now render images larger than screen resolution using OpenGL. |
OpenGL display There is a new support for texture repeat and alternate in the viewports and a new option in the camera display options called "Blend Using Alpha In Texture Decal." The "copy alpha to RGB" also works in the OGL display and even supports the alpha factor parameter to scale the alpha
|
The bump map generator has two new parameters (bump basis projection and bump basis UV that help bump map computation to produce bump-mapping without artifacts that are due to UV discontinuities. There are new options that allow the user to collect the image sequences produced by XSI and create MXF media files and a AAF master clip that describes them. This is usable in Avid products. There are also loads of other new options, keep in mind that some of these options are exposed in XSI v3.51 as well. The Motion interpolation parameter helps with blurring rotating objects (such as propellers) Late shutter opening splits the motion blur shutter option in the Render/Region Options>Motion Blur into two options. The first one controls when the shutter opens and the second one when it closes. Setting the two sliders to the same value can also be used to simply move the motion forward a bit without any motion blurring taking place. FG map fastlookup. This works in conjunction with global illumination to store some extra data and the global illumination photon samples that will speed up final gathering. View dependent final gathering generation changes the radius values from being interpreted as world units to pixel units. View Dependent gathering uses higher world unit radius for objects further away and lower for objects close. In effect the pixel then final gather ray is cast from is projected onto the object and that used to determine the radius of effect of the final gather sample. Shadow map bias controls
the distance offset to add to the shadow map. This can be used to
cure shadow overrun or shadow "acne" if the built-in shadow
map algorithm fails to generate the depth value accurately. A new
rendering parameter called "Shading Rate" has been added.
This parameter is used to control how often mental ray will over sample
a pixel for motion blurring. There is also a new parameter called
"Geometry Hair". This can be used to toggle rendering of
the mental ray hair primitive on or off. |
SIMULATION Rigid-Body Dynamics
(RBD) There are settings for, mass, density, center of mass, friction and elasticity. Mass defines the total mass of an object which determines how quickly it reacts to the forces applied to it. The more massive an object, the more difficult it is to change its direction. The center of mass is the location at which a rigid body object spins around itself when dynamics are applied (forces and/or collisions). Elasticity is the amount of kinetic energy lost from an object when it collides with another object. For example, when a billiard ball hits the table, elasticity influences how much the ball rebounds. Friction is the resisting force that determines how much energy is lost by an object as it moves along the surface of another. For example, a billiard ball rolling along a table has a lower friction value than a rubber ball along a table. |
It is very
east to set collision types, such as bounding sphere, bounding box,
bounding cylinder and actual shape. The first three shapes provide a
quick solution for collisions when accuracy is not an issue or the bounding
shape's geometry is close enough to the shape of the rigid body object.
Actual shape provides an accurate collision but takes longer to calculate.
It may be needed when geometry that is an irregular shape. Rigid bodies
can also have animated deformations applied to them. Animated deformations
include: lattices, shape animation, envelopes, waves-any deform operator.
|
You can
set constraints between rigid body objects to limit a rigid body object
to a specific type of movement. Hinge constraints make connected rigid
bodies move around an axis that acts as a hinge joint; that is, it provides
only one degree of freedom in rotation. Ball-and-socket constraints
make connected rigid bodies move around a pivot point, allowing them
complete freedom of rotation on any axis. Slider constraints make connected
rigid bodies move along a straight line, as in a telescope or along
a piston shaft. They provide one degree of freedom in position. Spring
constraints make rigid bodies move as if they are connected together
by a spring-like shaft. They provide one degree of freedom in translation
based on the spring's elasticity, but complete freedom in terms of rotation.
Fixed constraints keep rigid bodies in a fixed position and orientation
relative to each other or a point in space.
|
Rigid-body
objects can be either active or passive. Active objects are simulated
by the RBD solver. Passive objects are not simulated, but can be keyframe-animated
and also act as collision objects for active bodies. You can manipulate
passive bodies during a simulation, providing a way to interact with
a simulation environment
As you can see, the RBD's provide a lot of functionality out of the box. But that doesn't mean that people won't want to augment/change them. The core of the dynamics engine is a slightly modified version of ODE (www.ode.org). It is open source, which means it can be downloaded and modified as users see fit. This means that it would
not be difficult to compile a version of ODE which had the appropriate
hooks for what ever the user wants. ODE is written in C/C++ and compiles
easily on Windows and Linux, right off the website. As long as you
don't break its API, you should be able to mess around with the internals
of ODE as much as you wants, and drop it seamlessly back into XSI. |
Particles
Particle goals have been added to 4.0. Goals allow a simulated particle cloud to be attracted by one more or more objects. The goal object can be a polygon mesh, nurbs surface, lattice, particle cloud, nurbs curve, or any other object. Each particle is assigned a feature of the goal object to be attracted to. |
The target
parameter in the goal property page allows the user to choose what the
particles will go towards. Choosing surface directs each particle to
a randomly selected position on a surface, polygon mesh or nurbs surface.
A random U and V value is chosen as an attractor on that surface. Choosing
point directs each particle to a randomly selected point (control vertex)
on the goal geometry. Choosing line directs each particle to a randomly
selected position on an edge, isoline or curve of the goal geometry.
Choosing volume directs each particle to a randomly selected position
inside the target geometry. Choosing center directs each particle to
the center of the target object.
When using goals, particles can behave in many different ways. If you choose flee, the particles are repelled from the goal and move in the opposite direction of it, as if repulsed by its hideousness. If you choose stick, the particles immediately stick on the goal object as they are born; that is, the particles do not move from the emitter toward the goal and then stick on it. If you choose arrive, the particles move slowly toward the goal. If you choose Hooke's Law, the particles are linked to the goal by springs and dampers (viscosity). Particles can have more than one goal. Each goal property has a weight parameter that allows the user to blend the influence between the different goals. You can now create your own custom parameters per particle type on a cloud, providing more flexibility when building custom particle behaviors. Per-particle attributes are now exposed to the Object Model and C++ API.
|
Hair
Using the new Hair Geo shader, you can set the diffuse/ambient/specular color shading and transparency for hair that uses only the geometry render type. This offers better control (via gradient) over shading. You can also add incandescence (glow) for the inner and outer hair edges. You can control the hair's width by using inner/rim emissive color and transparency tapering, which improves the hair's overall look and reduces hair flickering. This way, you don't need to change the width of the actual hair geometry: Hair is now split into separate objects in roughly 400,000 strand chunks. This results in roughly 40,000 hairs per object given the default 10 segment hair for improved performance. If necessary, this can be adjusted by using the environment variable SI_HAIR_CHUNK_SIZE which can be used to specify a different chunk size. |
Syflex
Cloth
Users of XSI Advanced are in for a treat. The leader in cloth simulation, Syflex, has partnered with Softimage to provide a free license of cloth to every one of its users. Users of other versions if XSI are not left without a cloth solution though. They will get the XSI cloth included with their release as well. In this case, everyone wins. |
Animation Slider Constraint |
Rigging The built in rigs have improved a lot. You can now move the toe and the entire foot will move with it as well. You now get components that you can simply add to your rigs, such as fingers, hands, tails etc. There are also more options that enable skin sliding, better shadow rigs and ghosting, which is very valuable for accurate animation. Here are some of the new additions to rig making. Dog Legged Biped is a new guide and rig generation script for dog legged bipeds. Quadruped rig has a tail by default and can have shadow hierarchies. You also have the ability to create tails on bipeds by duplicating cube on base of the spine. There is an option to create a rig with ears. Biped guides have finger controls to control hands that can have fewer than 5 fingers (by deleting fingers on the guide). Fingers can have arbitrary number of bones (by deleting or duplicating finger joint guides) There is also a new Create Control splines tool. |
Timeline-Based Editing This new concept, known as timeline-based editing, allows XSI to dock several animation editors together in such a way that they will share the same master timeline, and thus be completely visually synchronized together. This makes it a lot easier to work with multiple editors on animation data, especially for synchronization work. Once views are docked this way, if you zoom or pan in one view, the other views and the timeline will adjust accordingly. Likewise, if you change the start/end or current frame the views will adjust. Three views support this mode so far: The function curve editor, the dopesheet and the mixer. |
Scrubbing options You can now do smooth scrubbing, in a variety of modes (direct sync-to-frame, realtime playback, vari-speed, or user-defined rate). Two scrubbing modes can be set, one for regular scrubbing, and one when you press 'shift', which allows you to quickly go from slow to real-time scrubbing. By clicking the mouse in the timeline and holding it for just a moment, playback will enter a 'quick loop' playback of "n" frames before cursor, and "m" frames after. Very handy.
|
Quaternion
editing and interpolation of rotations
It is now possible to convert euler rotation fcurves into quaternion fcurves. (Both back and forth). This allows editing rotation animation using the quaternion fcurves, in the fcv editor or dopesheet. In the fcurve editor there is a new "Quaternion Keys" toolbar. This toolbar is used to tweak the tension, continuity, bias, and spin parameters at keyframes. |
Phoneme
Key Display mode
There is a new display mode called "Phoneme Key Display Mode." When the phoneme key display mode is enabled, keys that belong to 'weight' fcurves (notably shapekey weights) will be displayed in an alternate way, allowing you to see which key has an effect where on the dopesheet over time.
|
Construction
Modes
Construction modes allow you to adjust anything on your character at any time. Imagine working with a character in a middle of a heavy-duty scene and needing to go back to tweak the envelope but not wanting to mess anything else up. With construction modes you can tweak your modeling at any phase of production without being forced to go back and refit your texturing, envelopes, shape animation, etc . That's a huge time and money saver for anybody's pipeline. By changing the construction mode display for different viewports, you could see your character in a "rest pose" in viewport A, allowing you edit the geometry or to play with its envelope weights, while still seeing the result with animation in viewport B. Additionally creating shapes by moving points/polygons/edges, allows the results to appear above the envelope operator even though the user is adjusting the base pose only. Most of what this new system allows was already possible in earlier versions of XSI. The only problem was that it required somebody who knew how XSI layers with and interacts with operators. It was very easy to mess something up if you forgot a step. Now it's a lot friendlier and faster, and the overhead in situations when you wouldn't need it is practically nil. In short, they pretty much
take the thought out of how to order your operator stacks, so less
"technologically advanced" users can better take advantage
of XSI's non-linear workflow for deformation and modeling. In fact,
they force you, without thinking about it, to sort your operators
in a way that keeps them flexible for such a workflow. |
Misc
cool stuff
There is a new preference that completely hides the transform axes during interaction. This is useful when doing fine positioning or work where the manipulators can obstruct the geometry. You can drag and drop an object or a single parameter into the background of the standalone function curve editor or dope sheet to add that objects or parameters curves to the display. There is a new user preference for the "maximum number of curves to load" in the animation editor when changing selection or during opening. This can help prevent a delay when loading a large number of function curves by mistake. XSI now has the ability to display an audio waveform in the background of the function curve editor. This is useful for synchronization of animation with audio. Audio Clips now have a time control property (like animation clips) which allows you to set the start offset and the clip in and out times. XSI can even mix and edit multiple audio tracks, to help any audio matching and lip-syncing. Many improvements have been made to scrubbing of audio and playback in general. Action sources now have a storage option with a filename as well. This now allows actions to be saved externally, and shared between scenes. The animation mixer has some new powerful cycling tools for building all kinds of cycles out of straightforward animation or mocap. For bones there is a new "Rings" icon type, which draws elongated spheres for bones. There are new options for Acclaim Import and Export. It can now generate bones or hierarchy of nulls upon import, add all animated bones within a group and put the action source within a mixer track. The Neutral pose (zeroing
pose) fuctions are great. The new animated pivot transforms are a
big timesaver as well. Authoring of shapes in combination with envelopes
is very nice and the Shape Explorer allows you to see thumbnails of
shape keys for selected objects or clusters, making life much easier.
There is so much more new stuff in the animation module, I wish I
had time to write it all down here. |
Modeling
|
Knife
There are new "knife" features, which work much like the knife tool in Lightwave. One is called knifing and the other is called slicing. They perform the same operation, allowing you to split the polygons of a mesh object along any plane, but the workflow is different. Knifing is an interactive
tool that lets you slice polygons by drawing a line in a 3D view.
The operator is applied but its property editor does not open automatically.
This tool is useful when you want to quickly and simply cut polygons
along a custom plane. Slicing performs the same operation and opens
its property editor, so that you can modify values. This command is
useful if you need to specify many settings: plane, offset, number
of slices, spacing, and so on. |
Poly
Reduction
There are multiple new polygon reduction tools in 4.0. The polygon reduction tool can work in symmetry and preserve the volume and the shape of an object. It is also pretty easy to make quads out of tessellated polys. This is done by interactively tuning the settings until the diagonal edges disappear. This tool is great for models that have been imported. There are tools for entering poly counts; angle limits the usual poly reduction settings. It is very fast and all texturing information is maintained. You can use a weight map to control the reduction in specific areas as well. |
There is a function called smooth transition that makes edges shrink before they collapse as the reduction amount is increased and corresponding properties, such as texture UVs and vertex colors, are interpolated. This allows the object to gradually morph when the reduction amount is animated, and avoids sudden popping in the object's shape or textures as edges collapse. There are LOD controls that allow you to generate several versions of an object at different levels of detail. Making it easy to perform tasks such as: transitioning smoothly between discrete LODs, and avoiding texture popping or pre-generating several LODs of the same object for use as game content. There are options to preserve
the objects volume exactly or partially, to adjust sharpness preservation,
to enhance symmetry processing, and ability to connect a symmetry
map. There are sliders to control the amount of preservation of quad
lines, and full parallel edge loop collapse mode. Individual preservation
control (fixed or weight) for features, such as: use-connected vertex
cluster, geometric borders, selection cluster borders, hard edges,
creases, material borders and property discontinuities. |
Subdivision
Surfaces
There are new tools that allow you to directly manipulate subdivision surfaces. This allows you to select points directly on the subdivision surface as with edges and polygons. There are also two new subdivision algorithms. XSI-Doo-Sabin and Linear Subdivision. XSI-Doo-Sabin smooths the
surface in a similar fashion as standard Doo-Sabin subdivision but
has several advantages over standard Doo-Sabin. When the subdivision
surface is subdivided, surface attributes such as polygon colors and
texture coordinates are properly propagated to the subdivided surface
without distortion or error. Creases can be applied to the object
in an intuitive fashion and will give results similar to the Catmull-Clark
creases. |
|
Scripting
|
|
Scene TOC |
Preferences
The preferences panel has been completely redesigned and is much more stable (In previous versions, when XSI crashed, it was one of the main reasons). It also takes advantage of all the now-standard scripting and navigation features since it's 100% XML based. All the settings are also accessible outside of XSI. All preferences in the system will be accessible through a single and unified mechanism with everything in one place; this makes it much, much easier to find things and to control them. |
XSI Cabs 4.0 comes with a new application, called XSICabs. It provides Softimage an easy way to resolve bugs in XSI. This program essentially packages a mail with all the information pertaining to the last crash you experienced. The information is gathered automatically, but you need to manually send Softimage the cab by email, so no information is sent to Softimage without your explicit consent. Softimage's goal in obtaining this information is to locate as precisely as possible what makes the software crash. (SCREEN SHOT) XSICabs provides Softimage
with the following pieces of information: An .MTT file. This file
contains information about the state of the program at the time of
the crash, as well as Mean Time To Failure information. A SCRIPTLOG.TXT
file. This is saved at the time of crash by XSI. It contains information
about the history of the session. A XSICMDLOG.TXT file: This contains
your session script. A XSICab_MissingFiles.txt file. This will be
present only if XSICabs can't find at least one of the above files.
It simply contains a list of the names of the missing files. |
Getting up and running with XSI no longer costs what it used to. Combine that with all the new freebies (rendering licenses, batchserve, etc ) and it becomes a very, very good deal. This sort of pricing is sure to bring in more new users.
Special thanks go out to
the people who helped with this article, but don't know it. Brad Gabe,
Robert Moodie, Raffaele Fragapane, Stefan Andersson, Christine Charette,
Jennifer Goldfinch, Ira Salsberg and Chinny. |