

The Picard tutorial
Before we get started I would like to thank Dave Lajoie for
inspiring this tutorial.
Special thanks to Psyop and the NYC XSI user group.
(Setup Time: 20 minutes)
Advanced users click here.
This tutorial is designed to present alternate ways of
creating a sub surface scattering effect using fake volume shaders and final
gathering.
 |
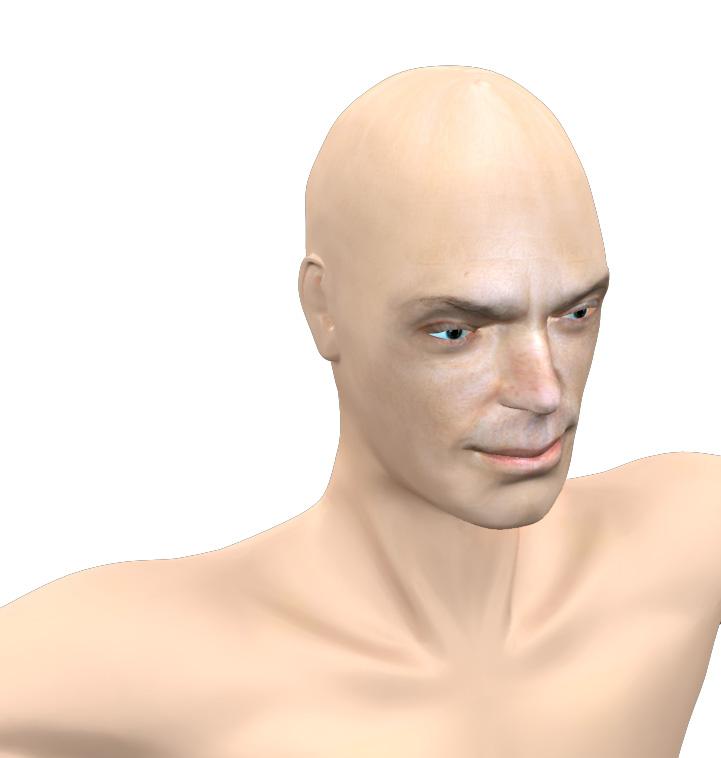
First start by getting the primitive
character model in XSI. GET-PRIMITIVE-MODEL-CHARACTER-MAN (or use your own model) Position the light the way you like turn on shadows and draw a render region. You should get something like what you see here in the picture. |
This is a pretty good start, the face has premade textures
and bump maps created on the model. This way we can
just focus on creating
the skin shader. Next I will show you how to use a gradient shader to create a
volumetric effect.
Also known as the Lajoie effect. =)
The difference, as
you will notice when you render, is that this effect is not expensive in terms
of render time.
But before we get started I just want to point out that XSI
has several different types of gradients.
Although they look similar they
use different parameters under the hood.
This will only become evident when
you open up the render tree.
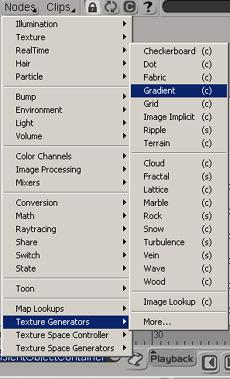
| In the render tree, when you select: nodes texture generators you will notice a gradient shader. | Also under nodes mixers you will find another gradient.These two shaders are identical. I'm not sure why XSI has these shaders in different places but they basically perform the same functions... maybe it is a redundancy that will be fixed in XSI v3.2? |
 |
 |
 |
Note that XSI has 3 gradient shaders. 2
of them are identical but the third one is a bit different.
The third gradient shader is located under NODES-->Textures--->Gradient
This is the shader that most of us use commonly when applying a gradient. It is located also under the get--> texture--->gradient tab.
|
Ok now that we looked over the different gradients let's build the volumetric effect.
| In order to see a volumetric sub surface we need to make our character a bit transparent. Don't just use grayscale values for the transparency. Make the transparency colored towards the skin tone. This will make the surface a bit blueish but will aid in the final look as we will see later. Remeber that light in the real world does not absord/reflect values evenly. |
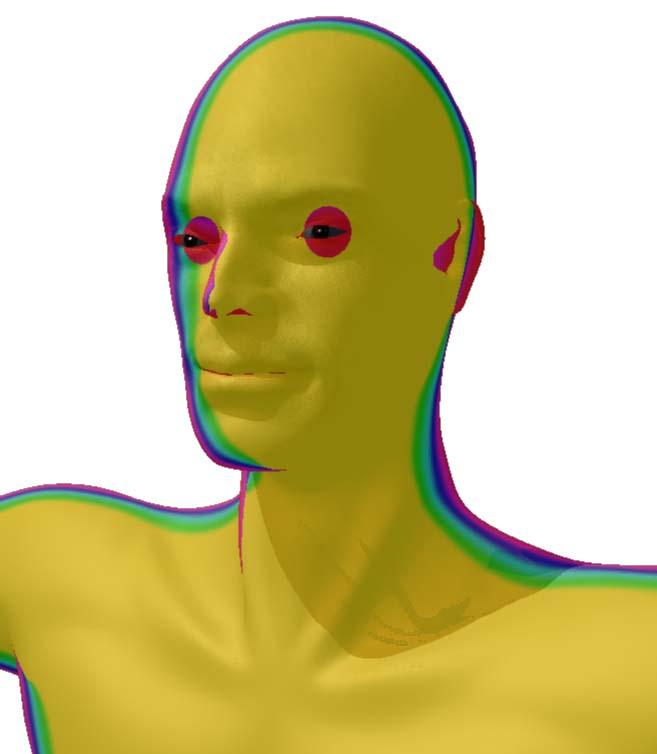 |
Now that our character has a bit of uneven
transparency I'm going to add a gradient mixer
shader from the render tree and use a scalar state node. The scalar
state node can be found under nodes-->states-->scalar state in the render
tree. A very useful tool. Unlike the incident shader, this shader
calculates scalar values.
Leave the default scalar state value to ray length. Connect the scalar state to the gradient input. Finally connect the gradient to the volume input
located on the material. You should get something like the picture on the
left. Weird huh? |
Next lets open the ppg for the gradient shader and tweak the
colors.
There are basically two settings that you will want to adjust to get
the effect you want.
First is the Input tab, here you will tweak the overall
effect of the shader and how the colors blend.
Play around with the min and
max values and see the effect they have on the model.
I setup the min and
max values to
min=-0.1 and max 4.211

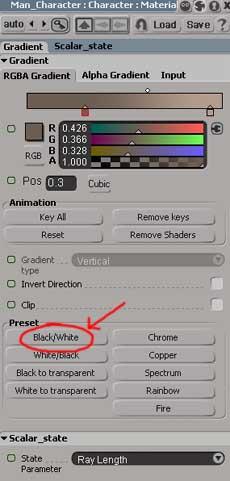 |
Next lets tweak the colors to get a
skintone. The gradient mixer comes with several predefined
presets. Click on the Black/White Preset. Set the colors for the first slider to R0.426 G:0.366 B:0.328 Set the colors for the second slider to R0.703 G:0.614 B:0.557 |
 |
Ok, so our skin is looking less transparent
and more translucent. This is pretty good. However, the lighting is
a bit too dark. There are two solutions. We could use final gathering to
bounce light around or add additional lights without final gathering and
increase the transparency of the shader to create the skin effect. I find
that final gathering is a better solution so we will use the
second. |
 |
The FG dome effect: 1.To setup final gathering make sure that you have only one light in the scene, set the light's color to black and turn off shadows. 2. Get a primitive sphere and use the following settings: Radius: 50 Start V: 105 leave all other setting to default 3. Apply a constant material to the sphere you just created and set R0.619 G:0.725 B:0.788 4. In the render region options turn on final
gathering and leave the defaults. |


