
Eye with XSI
Basic tutorial, made for version 1,5 of later XSI or. The first part is oriented
to learn to generate textures using the possibilities of the Render Tree and the
second sample some of the tools of the XSI that will allow us to automate animation
controls.
PART 0: Before beginning
A general recommendation at the time of considering any project made in 3d is
to have a clear idea of which we want to get to do. Always, until in smallest
of the projects he is useful to look for more information, coverall visual references,
images, videos, that contain great amount of useful data. For example, in this
tutorial which we want to do is an eye, everybody knows that it is an eye and
that aspect has, but in a photography, or a graph contains much more information
than our memory: on proportions, forms, textures, whatever shine a material or
whereupon reflected intensity.
In order to develop a model 3d of an eye to use it in a
personage, we will not need to reproduce all its internal structure,
but to know it will be to us of utility at the time of reproducing its
form to act.
PART 1: Textures for an eye
First that we are going to do it is to model two spheres so
that they have the appearance of an eye. It generates a sphere NURB
(get > primitive > surface > sphere), and closes the page of
properties leaving the values that appear.
It turns the sphere 90 degrees in x-axis.
It duplicates the sphere (ctrl.+ D) and reduces the new
sphere uniformly (scale presses X stops to activate the transformation
and manten pressing shift while you drag the mouse) until it is his
size is 0,97.
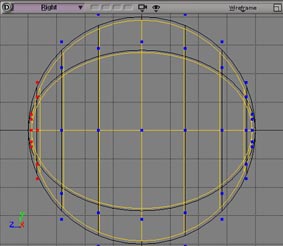
Key T for the selection of points presses now, and in the
Right window it selects the points of the left end as it is seen in
the drawing.
Scale in local way that selection to -2,3, (introducing that
numerical value in the square " and " of scale), moves that same
selection of points 0.75 units of Softimage towards the interior of
the sphere.
It selects the outer sphere now, and again it selects the
points that the following image shows.
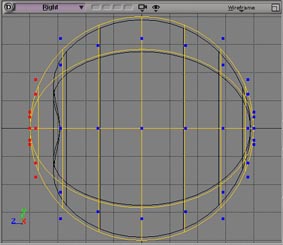
This selection to 2,5 climbs.
With this, already we have the form of the eye, the rest we
will do it using textures.
The button in the right superior part of window b presses to
extend the camera Vista.
You do to render of window on the spheres. They appear with
the gray material of the scene, and we can solely see the outer
sphere. We are going to create new materials for these objects.
It selects the outer sphere and in the module of Render (3) >
selects to Material Get > Phong. Apparently nothing has changed in
render (the sphere already had pong applied but it was the generic
material of the scene that is applied to all the new objects.
Whenever we are going to make changes on the material we will have to
create a new material, otherwise the changes are applied to all the
objects). The outer sphere is going to us to provide the brightness
of the eye, we will have to increase the luminosity of the color to
specular, for it we pressed button RGB, with which we will happen to
the way of selection HLS, from we can here increase to the value of
luminosity (l) changing the value by keyboard to 5. Also we are going
to reduce the diffusion of the specular brightness (to specular decay)
giving a value of 400, also by keyboard.
The superior eyelash Transparency/Reflection presses, we will
be able here to increase the value of transparency of the material, we
can use the color bars (pressing CTRL. So that the three move
simultaneously) until a value of 0.85 approximately. Also we are
going to slightly raise the value of the refractive index 1,06. And
with this we can close goes window of properties of the material.
We will select the other sphere now. Tree is this case we
are going to use the properties of combination of render to generate
the texture of the eye. Key 7 presses to open the window of Render
Tree. We can fit the size of this floating window and change the
point of view of the camera to be able to see l simultaneously scene
and render tree.
Pressing update in l Render Tree we made sure that the
representation of that Vista belongs to the selected sphere. As the
outer sphere already produces the brightness, we will assign a
material without property to specular to this sphere. Material Get >
> Lambert.
The material would have to also change in the Render Tree.
Within the Render Tree we selected a new one to shader to generate the
Nodes texture > Texture > Gradient, a new element appears in the space
of the Render Tree, we must connect selected and dragging the red
point of the node gradient to the properties ambient and diffuse of
the node Lambert.
Double click on the Gradient node and in the pagina of
properties that appear we assigned a new projection of texture in
New>UV, the rainbow that forms this texture, badly is oriented, to
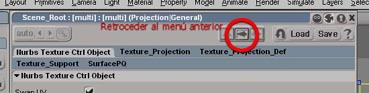
reorient it we pressed in the publisher of properties of the Edit
texture and activated Swap UV, first of the options that appear in the
new window.
We pressed in the icon of the arrow backwards to finish
publishing the texture.
We pressed the eyelash of Gradient colors in which we will
modify the values so that they agree with those of the following
table.
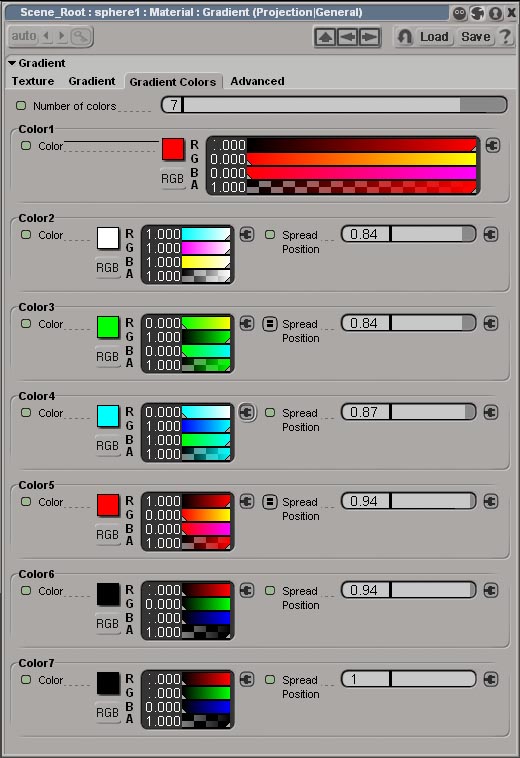
The steps that we have followed have been:
1. - To establish number of colors in 7.
2. - To increase spread position of color 2 up to 0,84; the
one of color 4 to 0,88; the one of the 0.94 color 6 to and the one of
color 7 to 1.
There are certain jumps of color between which it does not
interest degrading to us, but an abrupt change of color, we will use
equality expressions to establish these parameters.
3. - To press on the icon of animation (the green point) of
spread position of color the 2 and arrástralo pressing ctrl. on the
icon of equivalent animation of color 3. The same operation with the
icon of color 6 repeats on the one of color 5.
4. - To establish values of 0.0.0 for RGB for color 6, black
color. To press on the panel of color reference that we finished
modifying, dragging it and loosen it on its equivalent panel for color
7.
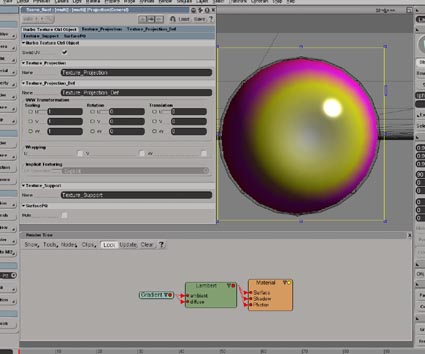
5. - It changes to the maximum (1) value R of color 1 to
have red an intense one.
The result of all these changes would have to be similar to
this image.
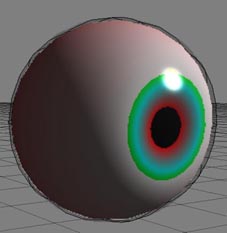
To press with the right button of the mouse on the
icon of connection to the right of values RGBA of color 4,
this unfolds a menu with the textures that can be applied, we must
select fractal.

The page on that we were working transforms into the page of
properties of the texture fractal. Again it requests a texture
projection to us, although in this case we did not need to create a
new one, since we can reuse the one that we have applied previously,
pressing on the triangle at the end of the box of dialogue and
selected Texture_Projetion.
Within this same page of properties we changed to the
Advanced eyelash now and there we modified the maximum values by 50,
30, 10 to obtain the radial form characteristic of a rainbow.
It presses the eyelash fractal and it blocks this table
(activating the icon in lock form it arrives at the right).
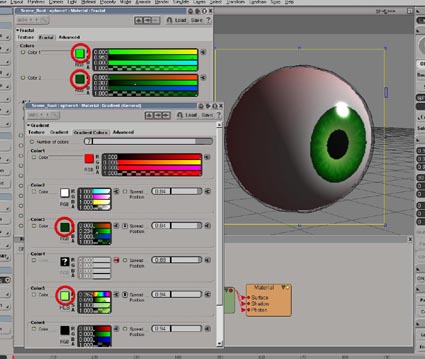
Beam double click on the Gradient node, of the Render Tree
that will unfold the previous table of colorores of the gradient.
Colors 1 and 2 of the fractal and the 3 and the 5 of the
gradient control l pigmentación of the rainbow. Modifícalos to your
pleasure. An example:
This it is a good moment to keep the scene.
PART 2: To create controls for animation
Once finished the modeled one and texturado we are going to
turn the result into a model. We selected both spheres, we pressed
key 1 to happen to the menu of modeled to Create > Model > New.
The model is the element of reference at the time of using
controls, like a container.
In order to create a table of controls we pressed 2 to pass
to the menu of animation and from Create > Parameter > New Custom
Parameter Seth to create a table of parameters there.
We could include different parameters to control different
parameters related to the animation (movements, etc.), in this case we
will only create one of these parameters to see its operation. Create
> Parameter > New Custom Parameter. In the table of properties we
changed the name of the parameter (by Param defect) by " Expansion of
the rainbow " and left the rest of values as they come by defect.
Now whenever we select the model of the eye we can find
between its properties (in a Explorer window or the Selection button
of the menu of the right) the table of parameters that we have
created. With double click we can open it and there " expansion of
the rainbow " will be the parameter, although at the moment he is not
tie to anything. The icon of the lock in the right superior part
blocks this table activating.
In render Tree we click double on the Gradient node and
activated the eyelash Gradient Colors.
It changes to the value of spread position in color 6 of the
gradient up to 0,98; spread presses with the right button of the
mouse the icon of animation of that position and chooses the option of
the Link menu with looks for in the Vista Explorer that unfolds the
parameter " expansion of the rainbow " that we had created. This
creates a relation between the values of both parameters.
" expansion of the rainbow " moves the sliding bar of the
parameter (value of 1) to the maximum changes again to the value of
spread position in color 6 of the gradient up to 0,93; spread again
presses with the right button of the mouse the icon of animation of
that position (that now has form of L with a curve raises) and this
time relative chooses the option Seth values. As of this moment it
has two values of reference tying both parameters and will make a
interpolación for the rest of values, now if, if we move the bar of
our customized parameter the expansion of the rainbow changes.
It presses on the icon with form of L and a curve and arrástralo until
the value of spread position of color 4. Of this form we were able to tie different
parameters from the same control. It presses with right button on the new tie
icon of color 4, in the menu chooses Publishing the Animation option. The curve
that appears in the publisher is not exactly a curve of valor/tiempo, this relates
the value of this parameter of spread to the value of the control of expansion
of the rainbow (valor/valor), we can modify the curve slightly moving it so that
it fits the aspect in the different values from expansion.