Making
Blubber Jiggle
A
tutorial by Chris Browne <pseudopod_prod@yahoo.ca>

Fig.1
This
is a tutorial on how to rig a fat blubbery character in such a way that when
s/he moves, their blubber flops around like real flab without having to key or
shape animate the fatness. This technique can also be applied to the breasts of
a female or transsexual character.
The
following tutorial is for Softimage XSI users who have a good understanding of
enveloping, character rigging and working with constraints for Inverse
Kinematics.
1.Start
by placing the appropriate bones in your character. Don’t worry about anything
but the character's regular bone setup at this point.

Fig2
2.After
the bones are in place, observe the areas in which the fatty parts of the body
extend (or hang) furthest away from the character's bones, where there would be
the most overlapping movement.
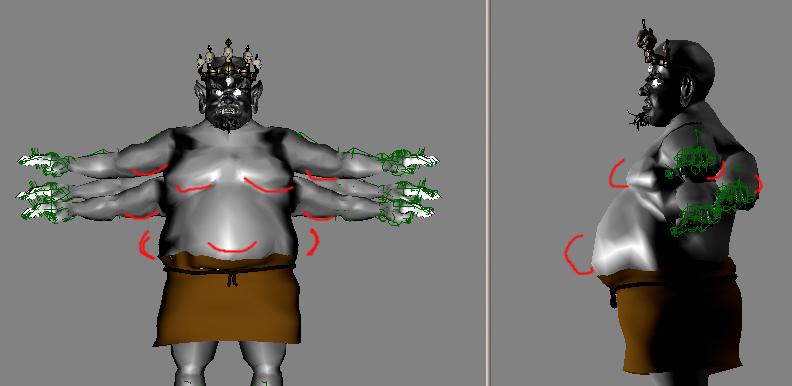
Fig3
*Like
most overweight people, the main areas are in the abdomen, chest, love handles,
under the biceps, and sometimes under the chin. This tutorial will focus on the
first three areas, however the technique can easily be applied to all five.
3.Make
your Mesh Object unselectable. Starting with the gut, find the closest
corresponding bone. Create two implicit objects, scale them down and arrange
them from the bone to the stomach bone.

Fig.4
4.Parent
the implicit object closest to the bone (make the implicit object the child of
the bone). Select "Comp" as in "compensate" under the
constrain tab. Then position constrain the other implicit object to the one
parented to the bone. (Observe the diagram below)

Fig.5
5.Select
the implicit object that is position constrained. In the explorer, open up the
object's properties and double click (open) the Position Constrain editor.

Fig.6
6.With
the Position Constrain editor open, under Coupling select SOFT. Decrease the
blend weight value.
Decreasing
the blend weight value causes the delayed or overlapping movement in the
constrained object. The amount that this is set at depends on two criteria; how
much overlapping movement will be necessary with the amount of blubber the
character has, and how fast the character is moving. This is a setting that can
be changed at any time whether it is after the character is enveloped, and or
after the character is animated. This is also a setting that can be changed and
keyed throughout an animation to get the desired result. This feature can be
keyed by selecting the green dot beside the slider. Since it is a variable that
depends on a certain situation, it is best to eyeball it, perhaps after there
is animation.
In
this scene, the character is walking at an average marching pace; therefore,
the settings for the "blend weight" will be best set according to
that. Set "Blend Weight" to 0.36. Don't worry about the other values
in the editor yet. Leave them at the default for now.

Fig.7
7.The
Love Handles work pretty much the same way as the gut, only they are arranged
along the side of the stomach bone. (The diagram below has the previous
implicit objects hidden for viewing purposes)

Fig.8
8.Repeat
steps 5 and 6 for the two constrained implicit objects. Set the blend weight to
0.7.
Now
that the stomach area is complete it is time to work on the chest.
9.
Arrange three sets of implicit objects on each side of the chest. (Use diagram
for reference)

Fig.9
Be
sure to position the top implicit objects at the shoulders. (Where the collar
bone meets the bicep)
10.
Parent the top (shoulder) implicit objects to their corresponding bicep bone.
11.
Position Constrain (with Comp selected) the next implicit object to the one
that was parented. Set the blend weight to 0.95 and set Coupling to SOFT.
12.
Position Constrain the implicit object after that to the one above. Set the
blend weight to 0.9 and switch Coupling to SOFT. (Make sure the settings are
the same for each side of the chest).
13.
Select all implicit objects that have been position constrained (and have not
been parented to anything) and Parent them to the top null of the skeleton
hierarchy.
14.
Make sure you name all of the fatty control objects as well with the bones.
This will make weighting easier.
15.
Make a group of all bones and fatty control objects and label the group as
"Deformers".
16.
Select your mesh object and envelope it to the Deformers.
17.
Weight your character smoothly throughout the areas where the fatty control
objects are so that there is no unnecessary creasing when they move around. The
"apply smooth" tool in the weight editor is useful for this.
18.
After the character is properly weighted Group all of the fatty control objects
and make them unselectable. Do not hide them, if they are hidden they will not
work.
19.
Animate the character. As the character moves around the fatty control objects
might move either to freely so it appears as though they have a life of their
own, or not enough to detect them. Experiment with the "Blend Weight"
slider of the Position Constrain editor to find the best fit. When the movement
is subtle yet noticeable, it looks the most convincing.
20.
If the fatty control objects tend to stick out or sink into the mesh (aside
from the blend weight), try adjusting the sliders under "Constraining
Object" in the Position Constrain property menu. In the diagram below, the
gut is set at -0.2 to get the fit for the particular movement that the
character is in. This function is fully animatable and keyable aswell.

Fig.10
21.
One last thing to note is that the constraining objects are live. This means
that as the character is moved they work, rather than only when you set keys.
This may mean that ten or so buffer frames might be required at the beginning
of an animation; however, they most likely wont need to be rendered.
Hopefully
this will be helpful in creating more convincing and life like animated
characters
This
tutorial was created by Chris Browne and was provided by Pseudopod Productions.
Chris
Browne is an Animator, Modellor and Visual Effects artist located in Vancouver
Canada. He recently completed his second short CG animated film titled BRAND
"X" Mas currently submitted in the film festival market. Aside from
independent films Chris also does freelance work in the field of computer
animation and visual effects, including work on MGM's Sci Fi series STARGATE
SG1.
To
view information on Chris Browne's first independent animated film please
select the following link:
http://www.bigfilmshorts.com/catalog/target.asp?FilmNumber=S%2D0305
For
more information email: