Date: March 28, 2003
Introduction
The reason I decided to write this paper was to help out my fellow 3D Artists converting from Maya to XSI. When we made the initial move to XSI, we hit a few brick walls during the transition in production. This is not because of the different feature sets, but because of the different workflows. Feature sets are only useful once you have a solid workflow.
I have scoured the net, asked many questions from fellow XSI users and even found my own ways to find a quicker way to do produce artwork in XSI.
Since we are production artists we really didn't have time to read all the manuals or read the tutorial book that comes with XSI. As production artists we have a bad habit of looking for a quick and dirty solution RIGHT NOW to get the project completed and look @ the manuals later. This paper should help you along the way of just getting started with your migration into XSI. I still strongly recommend that you do read the manuals and tutorial book as they are well documented. Perhaps read a few chapters while you are rendering instead of playing Half Life.
Topics Covered in this paper
- Quick Lingo Conversion & Interface Shortcuts
- Grouping objects to obtain an additional pivot point
- Where are my Virtual Sliders?
- Why can't I see my timeline?
- IPR Preview.
- Basic Geometry Shading
- Mapping the Alt + Space bar to Maximize the window
- Moving objects in the viewport while constraining to an axis
- Pick walking components (Updated)
- Closing Notes
- Resources & Credits
Quick Lingo Conversion & Interface Shortcuts
Maya |
XSI |
XSI Hotkey |
| Graph Editor | Animation/FCurve Editor | 0 (zero) |
| Outliner | Explorer | 8 |
| Hypergraph | Schematic View | 9 |
| Hypershade | Render Tree | 7 |
| Attribute Editor | Property Editor | enter |
| IPR Preview | Render Region | q |
| Render Globals | Render Options Property Editor | N/A |
| UV Texture Editor | Texture Editor | Alt + 7 |
| Fcheck | Flipbook | N/A |
| Attributes | Parameters | N/A |
| Locator | Null | N/A |
Interface Shortcuts
Maya |
XSI |
| F3 (Modeling) | 1 (Modeling) |
| F2 (Animation) | 2 (Animation) |
| F5 (Rendering) | 3 (Rendering) |
| F4 (Dynamics) | 4 (Simulation) |
| W (Translate) | V (Translate) |
| E (Rotate) | C (Rotate) |
| R (Scale) | X (Scale) |
Grouping objects to obtain an additional pivot point
We have all done it before. You're animating this really cool cube along a path and you don't want to constrain the actual cube on the path because you want more control so you can animate the cube locally….so what did you do? Yip, you hit that wonderful keyboard combo Ctrl+G. You grouped the object to itself to obtain another pivot point. This method does not work the same way in XSI. Let's talk about what grouping does in XSI.
When you group an object in XSI, you are not creating a new pivot point. Instead you are creating a container where objects share similar parameters (attributes). For example if I have 3 cubes and I want them all to have a Blinn shader with reflections set to .5, I would put them into a group and then assign a shader to the group.
So the million-dollar question is how do you get that extra pivot point
in XSI?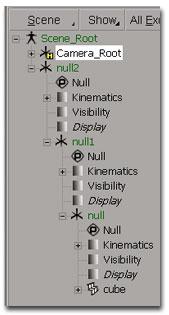 Simply create a non-renderable (null) object, move it to where
you want your pivot point to be and make it the parent of your hierarchy.
Simply create a non-renderable (null) object, move it to where
you want your pivot point to be and make it the parent of your hierarchy.
TIP: A null is like a Locator in Maya.
Example: You have a cube and you want 3 additional pivot points.
Create a null and transform it to where you want the pivot point to be.
TIP: Select the null and on the MCP hold down the Transform button to select "Match All Transforms" and then pick the cube. Your null will snap to the center of the cube.
Hit the Parent button on the MCP and with the lmb pick the cube. Or D&D the cube on top of the null in the explorer to put it below the null.
Now that you have the 1 null in place, you can just duplicate it x more times and parent the nulls under each other.
Note: Make sure that your additional nulls are above the cube in the hierarchy.
Where are my virtual sliders?
Don't worry they are not lost, they are just in a different place.
Virtual sliders in XSI use the mmb just like Maya but must be activated
with the F4 key.
Let's say you created a really hip chrome sphere and
you want to increase the u subdivisions via a virtual slider. All you have
to do is open the property editor for the sphere's create node. Select a
parameter to highlight it, hit the F4 key and just mmb drag to change the
values. Hit F4 key to escape this tool.

Why can't I see my timeline?
I don't know why but I have a solution! When I installed XSI for the first time, my timeline was cutoff. :)
This is due to the Windows Taskbar - Always on Top option. Disable this and the timeline will show up correctly next time you load up XSI!
If that doesn't work then.......
You can do 1 of 3 things to fix it.
Option 1
Download a layout from http://www.edharriss.com/
Option 2
Make your own custom layout. (See
manual)
Option 3
Modify the layout to show the timeline.
(It takes about 2 seconds)
If you choose Option 3 "the 2 second method", follow along:
- Click on Layout
- Edit Layout
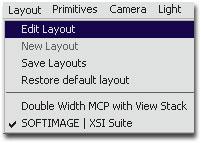
- Everything has a red outline. Now drag the timeline bar in the vertical direction.
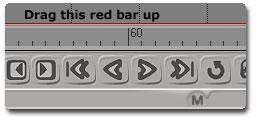
- Click on Edit Layout again.
- When the window pops up, choose Save.
- Done.
IPR Preview
IPR in Maya is very different to the Render Region in XSI. Actually I think the IPR in Maya is pretty much useless, but that's just my opinion so don't get mushy on me. You'll see why I said that in just a moment.
Let's talk about the Render Region……
To activate the Render Region
in XSI just hit the "q" hot key and draw a region in the camera viewport
and your scene will magically render right in the viewport. Actually it
will render in any viewport.
 The render region will use Mental Ray to render the
image. If you are really familiar with the IPR in Maya you'll be happy to
know that you can render ALL effects in the viewport with XSI. This
includes Motion Blur, Shadows, Glows, Global Illumination, Final
Gathering, EVERYTHING!
The render region will use Mental Ray to render the
image. If you are really familiar with the IPR in Maya you'll be happy to
know that you can render ALL effects in the viewport with XSI. This
includes Motion Blur, Shadows, Glows, Global Illumination, Final
Gathering, EVERYTHING!
Since it's interactive, you can move lights and geometry, whatever you want. I have even been courageous enough to dolly the camera in the render region. Yip, it updates!
You can also render selected objects only if you like…
Tip: 1 of the things that bothered me about the render region when I first used it was, I could still see the grey viewport in the background of the render region. To fix this just go to the rendering menu and hold the region button and select "show RGB". Now the background will be black just like when you render in the render view.
Basic Geometry Shading
Shading an object in XSI is quite different than Maya. There is no Hypershade in XSI instead you do most of your shader tweaking in the Render Tree. There are no shader balls in XSI as of this writing. Personally I don't need these shader balls since I have the render region.
While I'm on the subject of shader balls………If you want to preview just a certain texture effect in the render region just hold the "p" hotkey over the node in the Render Tree and the render region will show that node on the object.
Let's shade a simple sphere using the render tool bar and the render tree. We will apply a Blinn material to a sphere and then apply a texture map.
Ok let's begin:
- Select your sphere.
- Hit the "3" key for the rendering menu.
- Choose Get->Material->Blinn. (Why Blinn? Cause Mr. Blinn is a
cool guy!)
- Adjust the color sliders to whatever you want on the property editor
that opens up.
- To add a texture to this sphere, click on the little "wrench" icon
to the right of the color sliders of the diffuse channel.
- Choose "Image" from the menu that appears.
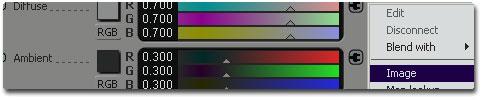
- By default the "noIcon_pic" is used as the texture map until you
actually specify a texture.
- To tell XSI what texture to use, you simply click on the New button and then New From File.
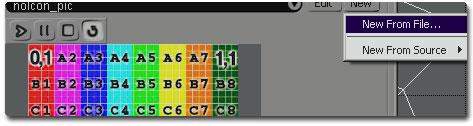
- Browse to your pictures directory to load the texture map.
- At this point your texture will not show in the render region
because you have not assigned a projection to the object.
- On the bottom of the property editor you will see the texture
projection area.
- Choose New and pick Spherical.

Congratulations your object has a shader and a texture assigned to the diffuse channel. Suppose you wanted to adjust more parameters on this shader, what would you do? Have no fear, just open the render tree. Select your object and hit the "7" hotkey.
Things are starting to look familiar now, a node based view with
connection lines….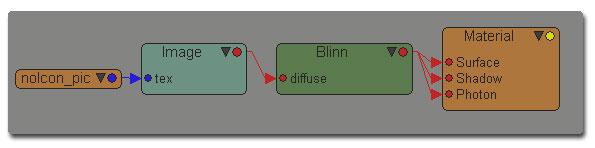
To edit any of the nodes, just double click on the node to open the property editor.
As you get more familiar with XSI you'll see how powerful the render tree is. Actually you could have shaded your object from the start with the render tree. As with any 3d package there are more than 1 way to do something, this is just 1 of them.
For more tutorials on shading, be sure to visit my friend's website, Ed
"the man" Harriss.
http://www.edharriss.com/.
Mapping the Alt + Space bar to Maximize the window
This one I see a lot on the message boards. In Maya you are used to hitting the space bar to maximize the viewport. XSI reserves the space bar hotkey to select/deselect an object.
The default key to maximize the viewport is "F12" in XSI. This is just way to far for my hands to travel. Let's change it to Alt + Space.
Note: The reason I'm not using just the "space bar" to maximize the viewport is because I usually select/deselect objects more often than I maximize viewports. No need to mess with the default key mapping.
- Choose File->Edit Keyboard Mappings
- Create a New Keymap by choosing the New button at the top of this gigantic window.
- Name this new keymap and hit ok.

- You'll notice 2 panes on this big UI. On the left scroll down and
choose XSI.
- On the right scroll down until you see"Maximize/Restore Current Viewport".

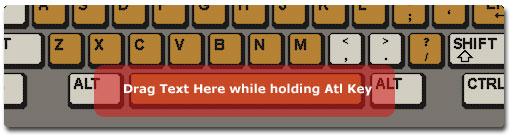
- While holding the alt button, drag the words "Maximize/Restore
Current Viewport" with your lmb on top of the graphic of the space bar
in the bottom pane.
- On the far top right of this UI just hit the ok button.
- Done.
Moving objects in the viewport while constraining to an axis
The first time I sparked up XSI, I went nuts trying to move an object
constrained to an axis.
As you know in Maya if you click on the Green
Axis arrow you are constrained to the Y axis, Blue Z and Red X.
In XSI, 1 of the ways to switch axis constraints on translate, rotate and scale is with your mouse buttons.
LMB will constrain you to the X axis.
MMB will constrain you to the
Y axis.
LMB will constrain you to the Z axis.
However this depends on what mode you are in. The above should get you going for practical purposes.
Pick walking components. (Updated)
Pick walking in Maya allows you to select a point on a curve or surface and use the up or down arrows to change your selection to the next point.
A correction has been made to the original paper.
This feature is also available in XSI. To pick walk components in XSI just use the alt + up/down arrow combinations.
For example, if you are working with a Nurbs Curve and you have CV(1) selected.
Hit alt + up arrow to select CV(2).
Here's a list of Pick Walking Shortcuts.
Alt + Up/Right : will move to the next
component (by INDEX). When it
reaches the last component it starts
again at the first one.
Alt + Down/Left : will move to the previous
component (by INDEX). When it
reaches the first component it goes back
to the last one.
Alt + Home : will move to the first component of the geometry.
Alt + End : will move to the last component
of the geometry.
Shift will extend the selection in all cases.
Don't forget about grow/shrink selection tools as well!
Closing Notes
There's no doubt that more could be covered when talking about converting techniques from Maya to XSI. However due to time constraints, the above is what I had time to write about. After all, I am a production artist!
For future papers I'd like to get into character animation techniques in XSI. Even though we set keyframes the same way in Maya, XSI and most other Animation Packages, I found XSI to be the quickest in animating a bipedal character.
Perhaps even a paper on Mental Ray's algorithm. Just the information of knowing how Mental Ray works will give you the power to control your final images offering you a higher quality in a shorter render time.
Hopefully, I'll have time to write this soon.
If you have any questions, comments or suggestions regarding this
paper, please feel free to contact me at rick@rickw3d.com. I will do my
best to reply to your email but can not guarantee it.
Enjoy,
/R
Resources and Credits
Softimage
More information on this great 3D
Application. They also have a tutorials bank to help you create stunning
visuals quickly.
http://www.softimage.com/
Ed Harriss
Here you will find the ultimate
collection of XSI tutorials, plugins, layouts you name it!
He also has
really good XSI training tapes which you can buy to help you with shading
and lighting. If you are a professional production artist or serious about
learning shading and lighting in XSI, these tapes are a must!
http://www.edharriss.com/
3D Buzz
This site is mostly a discussion forum site
with a search engine to almost every tutorial available on the Internet.
The 3D Buzz team has also developed a series of excellent training videos
which are free. All you need to do is join the site, sign up for the free
videos and participate on the forums. They even pay for the
shipping!
http://www.3dbuzz.com/
Patrick Perreault
Patrick works as Softimage
Graphics Support and showed me how to create the keyboard mapping and gave
me the update on why the timeline doesn't show.
Réjean Gagné
Réjean works as Softimage Group
Program Manager | 3D and updated me with the info on pick walking
components in XSI.