Setting up a scene for Global Illumination using mental ray in SOFTIMAGE|XSI
By: Ed Harriss
Requirements for this Tutorial: SOFTIMAGE|XSI 1.0 or Higher.
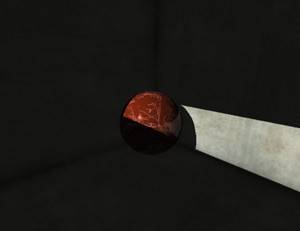
In this tutorial you'll learn how to take a "raw" scene that looks
like this:
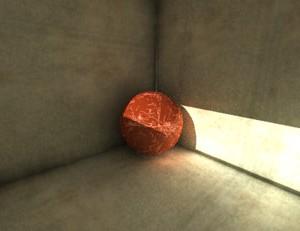
and set it up for Global Illumination and Final Gathering so that it in the
end it looks like this:
In order to follow the tutorial. You'll need this database. GlobalScenezip
(3.6meg)
This file has been compressed with Winzip. It's possible that you might need
to add the extension ".zip" to the end of the file in order for
it to work with your de-compression program.
In that database you'll find two scenes: Global and GlobalFinished. The one
that you'll be using to start off with is "Global."
"GlobalFinished" scene is the scene after all the steps in this
tutorial have been applied to it.
Open up the "Global" scene. By loading it through
the File menu.
The scene consists of: One light, a cube(Room) with a hole(Window) in it and
one sphere.
To save time and unnecessary clutter in the tutorial, I've already done a
few things to this scene:
1. The light has been placed and setup to cast shadows.
2. The Ambient Light has been turned down to Zero.
3. The Environment has been textured.
4. The Sphere has already been textured.
 |
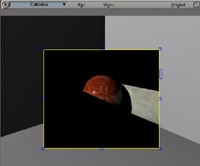
After loading the scene, change Viewport B into a camera view by choosing Cameras > Camera from the viewport dropdown menu. |
For Global Illumination to work you need 3 things.
1. A light to emit the photon rays
2. Objects to interact with the emitted photon
3. Global Illumination effects in the renderer.
Step One: Defining a photon ray emitter(light)
 |
1. Start by, selecting the light (the global-illumination source) and choose Modify > Shader from the Render toolbar. This displays the selected lights property page. |
|
|
2. Click on the Photon tab to display
the lights photon properties. |
 |
3. Define the light as a Global Illumination
source by checking the Global Illumination check box. This causes the light to emit photons. |
|
|
4. Set the Energy Intensity for the light to 140000.
Intensity is the option that controls how intense your Global Illumination
effect is. The higher the number the brighter the effect will be.
The farther objects are from the light the more energy that will be
needed. Energy values don't affect rendering times, they just amplify
brightness of the Global Illumination effect. |
 |
5.Set the Number of Emitted Photons to
20000 for the global-illumination effect. This value specifies the number of photons that the light emits. Lower values (like 1000), cause fuzzy puddles of light but render faster, so it's good for tests. High values will create smooth Global Illumination effects but render much slower and are better for final renderings. |
Step Two: Transmitters and Receivers, Setting up objects to interact with
the emitted photons
| 1. Select the Sphere. |
|
|
2. Right-click the Property button(XSI 1.0) or the Selection button(XSI 1.5) on the Selection panel |
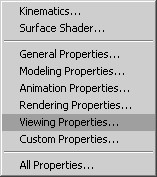 |
3. Select Viewing Properties from the
drop-down menu. This will open the Visibility property editor. |
|
|
4. Select the Visibility tab. This will display the render-visibility options. |
|
|
5. Select the Global Illumination transmitters
and receivers check boxes. This will cause the object to reflect light as well as receive reflected light. |
The red sphere will now bounce red light back into the scene because you have
set it as a transmitter.
It will also accept light that has been bounced from other objects because
you've set it as a receiver.
Repeat the steps for the Walls.
| 1. Select the Room. (Cube) |
|
|
2. Right-click the Property button(XSI 1.0) or the Selection button(XSI 1.5) on the Selection panel |
|
|
3. Select Viewing Properties from the
drop-down menu. This will open the Visibility property editor. |
|
|
4. Select the Visibility tab. This will display the render-visibility options. |
|
|
5. Select the Global Illumination transmitters
and receivers check boxes. This will cause the object to reflect light as well as receive reflected light. |
The room will now bounce light back into the scene because you have set
it as a transmitter.
It will also accept light that has been bounced from other objects (like the
sphere) because you've set it as a receiver.
Step Three: Turning on Global Illumination and Final Gathering for the
render region.
 |
1. Draw a render region in the viewport
that shows a camera view. (Viewport B) Press the "Q" key on your keyboard and drag across that viewport from left to right. This will allow us to see the results of the render as we tweak it. |
 |
Note: Global Illumination effects can take quite a long time to render. If you've got an older computer you might want to turn the auto refresh for the render region off. This will prevent it from updating everytime you move a slider or click a button. If needed press the render region button and toggle Auto refresh off |
Edit the render options:
  |
|
|
|
3. Click the Optimization tab, 4. Select Grid as the Acceleration Method. Changing the acceleration method to Grid will speed up renders that use global illumination. |
|
|
5. Click the Photon tab, 6. Select the Global Illumination check box. The selected effect is now visible in the render region. |
|
|
(If you've disabled auto refresh click the refresh button to update the render region.) |
Your Image should look like this:
Not so good eh?
The Global Illumination effect need to be fine tuned.
Final Gathering needs to be added.
Fine tuning your Scene.
The Global Illumination effects are set up in your scene, but they
have not been tuned enough to yield good results.
|
|
Under the global illumination check box there are two "tuning"
settings: |
Accuracy: Represents the number of photons that the renderer
looks for within the area represented by the Radius(see below). It then uses
what it finds to define the look of that area. Low accuracy numbers will yield
grainy images, High accuracy numbers will give you smother more precise results
but will take more time to render. If you set the accuracy value higher than
the number of photons emitted by all the lights in the scene, your image will
never render because the photon calculation won't finish.
Radius: This is the size(in Softimage units) of the effect that the
photon produces when it hits an object. Larger the numbers produce bigger
effects, but usually less accurate results. (unless you scene is scaled up
very large and you've used really high accuracy settings) High radius values
combined with low accuracy values can give you a good "quick and dirty"
approximation of what your scene will look like. (Great for test renders)
Low radius values combined with high accuracy values will provide the most
accurate representation of the final image but will take much longer to render.
The default settings for radius are 0. Don't be deceived by this low setting.
It's not really producing photons that are 0 in radius. In this case they
are actually close to 1.3 in radius. Since it's a "default", the
0 setting is the only one that doesn't accurately represent the size of the
radius. The setting of zero causes SOFTIMAGE|XSI to make a "best guess"
and a lot of the time it's guess is pretty good.
Global Illumination alone can be used to produce good quality images. But
if you combine the power of Global Illumination with Final Gathering, the
results can be much more realistic than if you used Global Illumination alone.
|
|
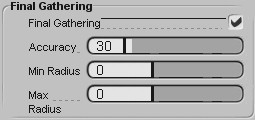
7. Turn on the Final Gathering effect by checking the Final
Gathering Check Box. |
Your image should look like this:
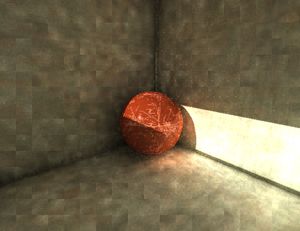
Getting closer, but the image is filled with artifacts.
With a little more tuning it'll look much better.
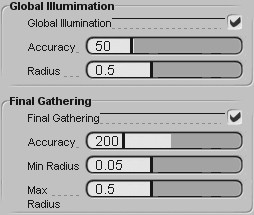 |
8. Turn the Global Illumination Accuracy up to 50 |
Depending on the speed of your computer it may take quite some time to
render this image.
Now would be a good time to take a break. =)
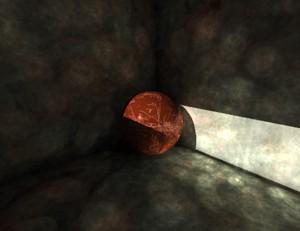
Your image should look like this:
Looks pretty good. You may see some artifacts if you render the image large
enough, adjusting the Final Gathering accuracy, turning the min/max radius
down and turning up the number of photons that the light emits can clean up
the artifacts and will usually fix that problem.