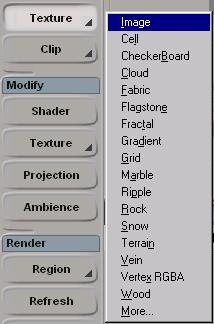
The first texture is assigned normally. (Get>Texture>Image)
SOFTIMAGE|XSI: Videos 1.0 to 1.5/2.0 transition
guide/FAQ
Softimage has released many versions of XSI since I made the SOFTIMAGE|XSI videos.
In these new releases there have been a few minor changes, but nothing that
prevents the videos from being useful..
A few people have been confused about some of the minor functionality issues.
Those are discussed here and solutions are presented below.
The most notable change involved any project that assigns
more than one texture to an object.
The first texture is assigned normally. (Get>Texture>Image) |
|
| The second, third, etc... should be assigned using (Modify>Texture>Add>Image) | 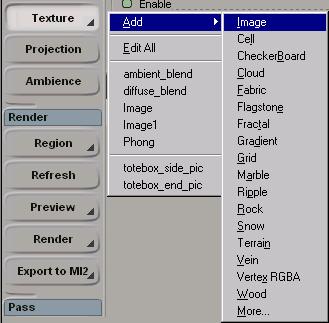 |
Explanation: Get>Texture>Image is now used to set up all the initial
connections or erase all the existing ones.
If Get>Texture>Image is used two times in a row. The first texture gets
erased by the new connections set up by the second texture.
Listed below are the projects in Mastering Materials that use Get>Texture>Image
more than once on the same project.
Be sure to use Modify>Texture>Add>Image when assigning any texture
but the first one.
Alpha_Blending_Project - This is the project with the Hand. When assigning
textures 2 and 3, please use Modify>Texture>Add>Image instead of Get>Texture>Image.
Box_Mapping_Project - This is the project where you assign three textures
to all sides of the box, but they don't smear down the side. When assigning
textures 2 and 3, please use Modify>Texture>Add>Image instead of Get>Texture>Image.
Bump_Mapping_Project - This is the project with the "carved wood".
When applying the second texture use Modify>Texture>Add>Image instead
of Get>Texture>Image
Texture_Blending_Project - This is the project with the "scratched
wood". When applying the second texture (wood_rings.pic) use Modify>Texture>Add>Image
instead of Get>Texture>Image
These two projects also use multiple bitmaps:
Dirt_Mapping_Project
Specular_Mapping_Project
(I think I've made the point, no need in going into detail on these two. But
if you have questions, or really want me to go over these, please feel free
to e-mail me EdHarriss@EdHarriss.com)
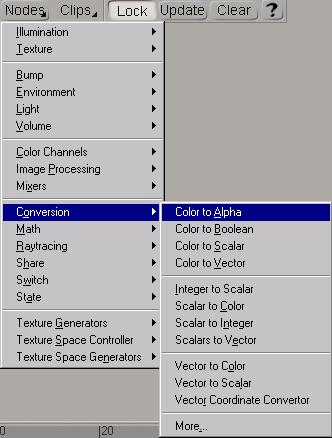
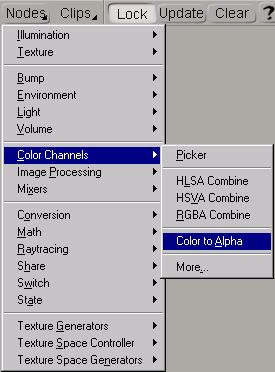
The "missing" Color2Alpha node.
Mastering Materials: Alpha_Channel_Project - This is the project where
you make a Palm Tree with 2 polygons. When creating the transparency you are
told to use the Color2Alpha node from Nodes>Conversion>Color2Alpha this node
has been moved to Nodes>Color Channels>Color2Alpha. It's the exact same node,
Softimage has just changed it's placement in the menu structure.
| The way it appears on the video and in XSI 1.0 Nodes>Conversion>Color2Alpha |
 |
| Color2Alphas "new location" The way it appears in XSI 1.5 Nodes>Color Channels>Color2Alpha |
 |
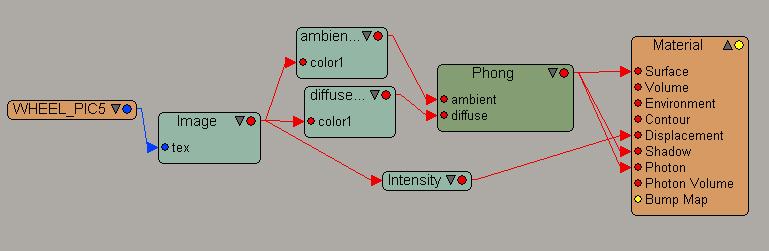
No Need for a Color2 Scalar node in the Displacement_Mapping_Project
Mastering Materials: Displacement_Mapping_Project - This is the project
where you make a tire using displacement maps. Displacement mapping has been
changed from 1.0 to 1.5 so that the color2scalar node is no longer needed between
the texture and the materials displacement connection point.
Your rendertree should look something like this:
Having A Problem with the CD?
A couple of people have had problems with the Mastering Matierals
CDrom. The problem is that some cd drives read the files with an uppercase extension.
(.SCN instead of .scn) XSI has a problem with this. Softimage knows about it
and is working to fix it. There are four things that can be done to fix it.
1. Ask me to send you another CD. I will, free of charge.
2. Try dragging the scene file from the scenes folder into the XSI interface.
Sometimes this forces XSI to open the file.
3. If you are in a rush you can copy all the files to your hard drive and rename
the scn files. You will need to rename the entire file, not just the extension.
Example: rename TREES.SCN to new.scn
4. I've got the entire CD on my web site. (24meg) I'll give you the location
and you can download it.
Think some of the Projects are "empty" or "missing"
?
On the Mastering Materials CD there are scenes that appear "empty"... like the
Animated texture project. It's not really empty, it just looks that way. This
is because that scene just uses a grid, and creating that grid is part of "following
along" with the video. The texture maps for it ARE in the pictures folder though.
These scenes might seem empty, but they are actually saved scenes from the beginning
of the demo on the tape. (With proper viewport displays and cameras in the right
spot, etc....) I do this so, when you are flowing along, dialog boxes and objects
will appear in the same place on your screen as they do in my examples on the
tape. The empty scenes are only missing simple primitives like grids and boxes.
I believed that if I included them in the scene, people watching the tape would
think "Why is he telling me to get>primitive>ploygon mesh>cube? There is already
one in the scene." If anything more complicated than a single primitive is used
then, of course, it's in the scene file.
To avoid any confusion...here is a list of the "empty" scenes and the primitives
that you'll need to do the projects.
Box Mapping (Just a cube)
Double Sided shader (Just a Grid)
Bump Mapping (Grid again)
Texture Blending (Grid again)
Reflection Mapping (Just a Sphere)
The only scene that does not exist at all is the "Constant_Materials_Project"
it doesn't even have a scene file because it's just a grid too. Again, the texture
maps for it are in the pictures folder.
Misc
Many people have asked, "What type of machine was used to make the Mastering
Materials video?"
The Tape was created using an NT machine. Dual 1000mhz Intergraph with a Wildcat
Video card and 1 gig of ram.
1. Start with a new scene. File]New Scene.
2. Turn Viewport A into a property Editor.
3. Create a Sphere (Get]Primitive]Polygon Mesh]Sphere).
4. Connect the Toon_Paint_and_Host shader to the object's Material surface by
choosing Get]Material]Toon
5. Draw a render region in viewport B by pressing the Q key and dragging from
left to right.
6.Also turn on the background by clicking Render]Region]Show RGB.
Now your object has the toon material on it, but no wireframe materials.
It should look like this:
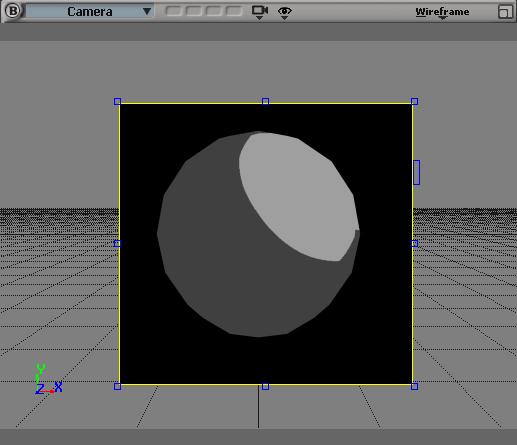
The object is still shaded. In order to see the wire effect we will have to
connect the cartoon lens shader to the camera.
7.Turn viewport D into an Explorer by clicking the titlebar and choosing Explorer
from the dropdown menu.
8. In the Explorer expand the camera_root node and click on the icon next to
the word "Camera". The camera property page will open up.
9. Click the Lens Shaders tab, and press the "Add" button.
10. When the browser opens up click on the "Lens" folder, highlight
the Toon_Ink_Lens shader, and click OK. The Toon_Ink_Lens shader will be added
to the stack.

The location of this shader will be something like this:
Softimage\XSI_2.0\Data\DSPresets\Shaders\Lens
11. Highlight the word "Toon_Ink_Lens" in the Lens Shader stack and
click "Inspect". The Toon_Ink_Lens shader controls will appear.
12. Click the Sampling tab. Check the box next to "Enable" and "Merge
Coplanar".
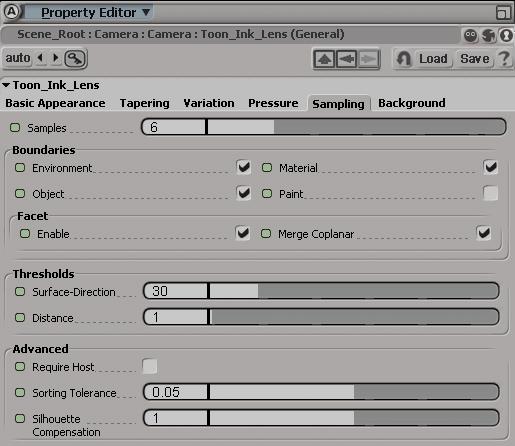
This option forces mental ray to render the ink lines on top of the objects.
In order to render just the wireframe and none of the shading, you'll need
to adjust the objects toon shader.
13. Select the sphere and click Modify]Shader.
14. Click the Transparency/Reflection tab and check the box next to enable.
15. Also, make sure that the color is set to 1.0 in R, G and B.
![]()
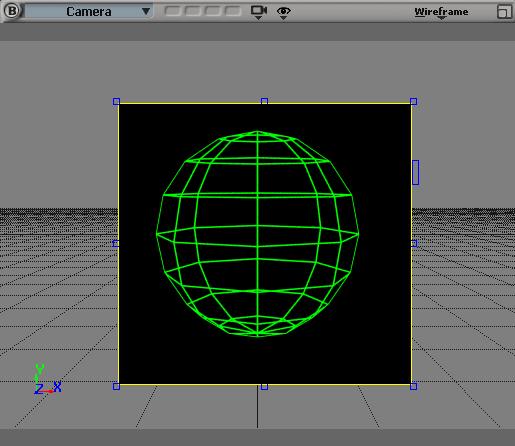
Now the objects material is transparent, but the wireframe is not visible. This
is because the wireframe is dark grey and does not show up against the background
very well.
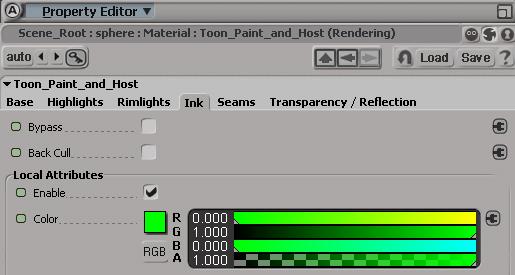
16. To fix this, click the Ink tab and check the box in the Local Attributes
section, located next to "Enable."
17. Then change the color to something bright. (I used Green.)
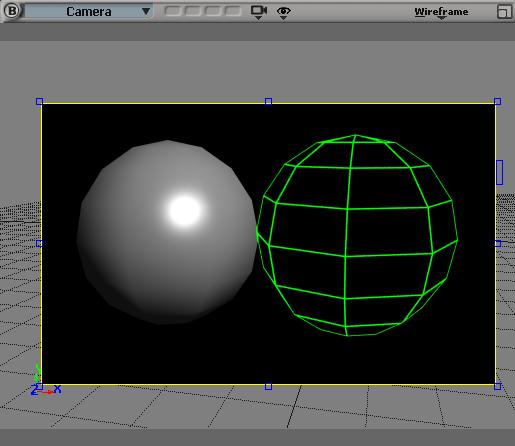
The resulting render looked like this.
18. If you check the Back Cull box at the top of the Property Page, then all
the wire frames associated with normals that are facing away from the camera
will not render. This gives your wireframe renders a more solid look commonly
called "hidden line" render.

This setup works just fine if you want all your objects to have wireframe materials.
But what if you want to mix wireframe and real shading? There is a way, and
it's really easy.
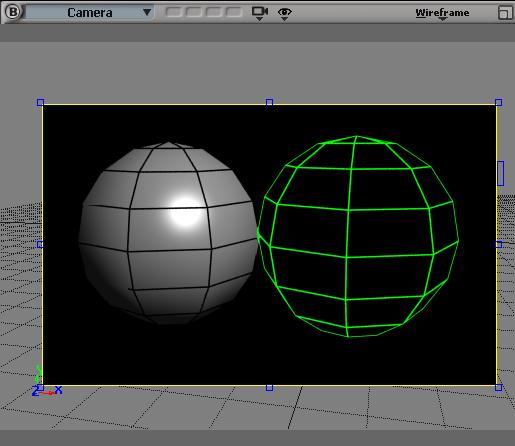
19. Try this…. Create another Sphere (Get]Primitive]Polygon Mesh]Sphere).
20. Translate it off to the side so that you can see both spheres. The new sphere
has the "wireframe on top look."
21. In the Explorer click on the icon next to the word "Camera". The
camera property page will open up.
22.Click the Lens shaders tab. Highlight the word "Toon_Ink_Lens"
in the Lens Shader stack and click "Inspect". The Toon_Ink_Lens shader
controls will appear.
23. Click the Sampling tab and uncheck the box next to "Require Host".

Now you've got independent control of the wireframe effect on an object-to-object
basis and with just a few clicks you can have mixed wire and shaded rendering
on the same object.